3-1. Mail Manager
The first window that opens when
double-clicking Magellan is called Mail Manager.
You can read and manage e-mail in this window.
3-2. Overview of Mail Manager

Mail manager has icons at the top of the window,
View list and Mail list fields are under the icons.
| Icon | Work of the Icon button |
|
|
Check mail. It starts receiving e-mail by clicking. |
|
|
New message. A window in which you can write new message will open. |
|
|
Find in message(s). |
|
|
Send mail. Selected message(s) will be sent. |
|
|
Reply to message you have received. You cannot click this icon unless any message is selected. |
|
|
Forward message you have received. You cannot click this icon unless any message is selected. |
|
|
Move selected message to Trash. Clicking this icon once is just moving, not deletion. Select the Trash view, then click Trash icon again and selected message will be deleted. |
|
|
Open Address book window. By Option key + clicking the icon while any message is selected in the mail list field, you can open Address Book the sender is directly added. |
|
|
Show HTML e-mail in your web browser. |
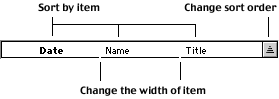
Drag the line under the Mail list, and you can increase or decrease
the fields.
In the same way, you can change width of date, name and title
by dragging the gap of line.
Date and Time format can be changed in the Date and Time control
panel.
At the bottom of the Mail Manager window, there are following
icons.

This is for finding related e-mail.
When "References" or "In-reply-to" header
has been added in the message, Magellan can trace back the sent
message from received reply message. It works as long as message
was sent from the e-mail client that add the "References" or "In-reply-to" header. If both sender and receiver
use Magellan, related e-mail is pointed out by clicking this
icon, the first and last related e-mail is opened in each Mail
window.
Tracing original e-mail from reply e-mail is done over multiple
Views and messages during one month. Click the "back" button, and original e-mail will be shown.
3-3. Concept of Mail Manager
In Magellan, you do not have to
make folder to classify e-mail.
Magellan stores up e-mail either you received or sent one-dimensionally.
You can decide which message is shown and how you read them in
the Mail Manager window. As soon as you select any View in the
View field, Magellan will find the messages and show them that
fit for conditions of your View.
View is the settings of sheaf in which you can read necessary
messages without moving any message itself.
For example, if you have made a View that shows all of received
messages and another View that shows messages sent from your
friend in this month, two Views will have overlapped messages.
Because you can set various View conditions by yourself, messages
can be sorted freely and variously as you wish.
Magellan's Basic Views are following 4.
Arrive, Draft, Unread, Trash
Additionally, 3 initial Views are made: Inbox, Outbox and Recent.
Basic Views are not able to change. But you can change conditions
of initial Views.
Double-click the icon of View, and you can see the settings of
View.
| TIPS | Basic View |
| Arrive | When you received new message, Arrive View is automatically selected. Message you have read in the Arrive View will be handled in the same way as other messages in the Inbox. On the other hand, message you have not read yet will necessarily remain in the 'Unread' view. |
| Draft | While written message is saved and have not sent yet, it is listed in the Draft View. |
| Unread | Message you have not read yet remains in the Unread View. After you read or open message or message is once shown in the mail body field, it moves to Receive View or other View you have made. |
| Trash | When you select message in the mail list field and click the Trash icon, the message will move to the Trash View. In other words, Trash View is for messages prepared to be deleted. Open the Trash View and click the Trash icon to delete message completely. |
View name is indicated with bold style if it has a mail.
3-4. Making View
Select 'Add View' from the View menu, and the View setting window will open.
Give name to a View first.

| Target | Select from Inbox, Outbox, or Both of which messages you want to include in the View. |
| Include unread mails | If this is checked, unread mails will be included in the View. |
| Time span | Mail
selection by date. Date format accords to the System automatically. (Order of Month/Day/Year) |
| Name | If you can specify the name of a person or Group you had contacted, messages can easily be abstracted. Enter a part of e-mail address or nickname. People you can select from Pop-up menu at the new mail window will also appear in the Pop-up menu of Add View window. In order to specify Group, pressing Option key and Group name will appear in the Pop-up menu. If multiple people or Groups are selected, the View includes messages containing either of them. |
3-4-2. Detailed setting for View:
Click the 'Detailed' button and you can set more detailed View.
| Label | You can abstract messages by label color. |
| Account |
Select from Pop-up menu, or enter your account directly to/from which account you sent/received. If you do not specify account, all of the accounts will be target of View. If multiple accounts will be entered, message to/from either account will be target. |
| Keyword | Messages that include certain Keyword are abstracted. |
| Attachment | You can abstract mail searching from 'with' or 'without' attachment. |
| Hide mails from other Views | If this option is selected, mails of the View will never appear in other Views. You can handle message from mailing list more easily. |
| Notice | Even if 'Include unread mails' is checked, Unread mail that contains Keyword will not appear in View. Because Magellan has not read 'Unread' message yet. |
3-5. Edit View
| The left picture shows initial
Views. You can edit setting of these Views easily. Select View you want to edit, then select Edit View from the View menu, or Double-click the left icon |
|
| View setting window will open in which you can change setting. Click OK button to complete setting. |
| TIPS | Changing color of View icon |
 |
You can change View icon color
in the View window by clicking icon beside View name field. You can use keyboard shortcut in selection of View if each Views have different colors. If View icon is not changed, keyboard short cut is unavailable. Above picture shows that Inbox View is selected by command+2. |
3-6. How to use Mail Manager

When a View is selected in the View List
field, corresponding messages will be listed in the Mail List
window.
Select a message in the Mail List and the e-mail body will be
displayed in the Mail Body field.
When one message is selected in the Mail List, you can read through
the View with Space key or Enter key scrolling the message to
next message. (If the message is Korean, Space key is unavailable.
Please use Enter key.)
Double-click the massage in the Mail List field and it will open
in another window.
You can see detailed header of received e-mail.
| By clicking the Window layout button, you can switch three layouts of each fields so as to use Mail Manager easily. |
3-7. Mail Icons
In the Mail list field, following icons will be added to each messages.
|
|
|
|
|
|
|
|
|
|
|
|
|
|
|
|
|
|
|
3-8. Label
You can put label to each messages on the right of the Mail icon.
Usually label is used as a mark of important e-mail or not to be forgotten or missed.
 |
To put Label, click the right
of Mail icon and select label from the Pop-up menu. You can also
put label from menu. Select message in the Mail list and then
select label color from Label menu. If your Macintosh has Function keys, F1-F7 are assigned to each label colors. Escape key is assigned to clear Label color. Name of each Label is same as the Finder's. To change Label name, select Preference of the Edit menu of the Finder, and change in the 'Label' tab. Changed name will be available after restart of Magellan. |
3-9. Shortcut Keys of Mail Manager
| Mail List | Shortcut |
| Move to above/below message | |
| Add selection to above/below message | |
| Move selection to the Top/bottom | |
| Move to next above/below Labeled message | |
| Move to next related e-mail | |
| Back to related e-mail | |
| Space, Enter key | Scroll body of selected message and read through next message |
| F1 - F7 key | Change or add Label |
| esc key | Clear Label of selection |
| Option+Trash icon | Delete only Attachment of the mail. |
| Command+Delete | Move selection to the Trash, delete selection in the Trash |
| Command + Shift + Delete | Empty the trash |
| Control+click | Show context menu of selection |
| Click+Hold | Show context menu of selection |
| List Selection | |
| Shift+select | Select all messages between message to shift+selection |
| Command+select | Select plural messages at random |
| Mail body | |
| Space | Scroll down and move to next page. |
| pg up/pg dn | Scroll up and down. (Available if your keyboard has pg up/pg dn keys.) |
| Home/end | Move to Top or bottom of message. |
| View List | |
| Tab key | Select forward View |
| Tab+ Shift key | Select back View |
| Tab+ Option key | Select next Window |
| Tool icons | |
| Receive icon | Selective mail checking with Control+click |
| Selective mail checking of any accounts with click and hold | |
| New icon | Open new mail to specified person with Control+click |
| Open new mail to specified person with click and hold | |
| Send icon | Send labeled Draft mail with Control+click |
| Reply icon | Open template in reply message with Control+click |
| Open template in reply message with Click and hold | |
| Forward icon | Forward to specified person with Control+click |
| Forward to specified person with Click and hold |